
Our tool helps you read a 402 Exotics animal’s ID, view available ancestry, and print an identification card. You can also make keeper cards for any animal in your collection, using information you enter yourself.
Decode a 402 Exotics animal ID
Keep the original delicup label or a clear photo. Copy the complete ID, including any number after the final period. The example below, CC.AX.121212.2, demonstrates the tool; it is not a sale or ownership record.
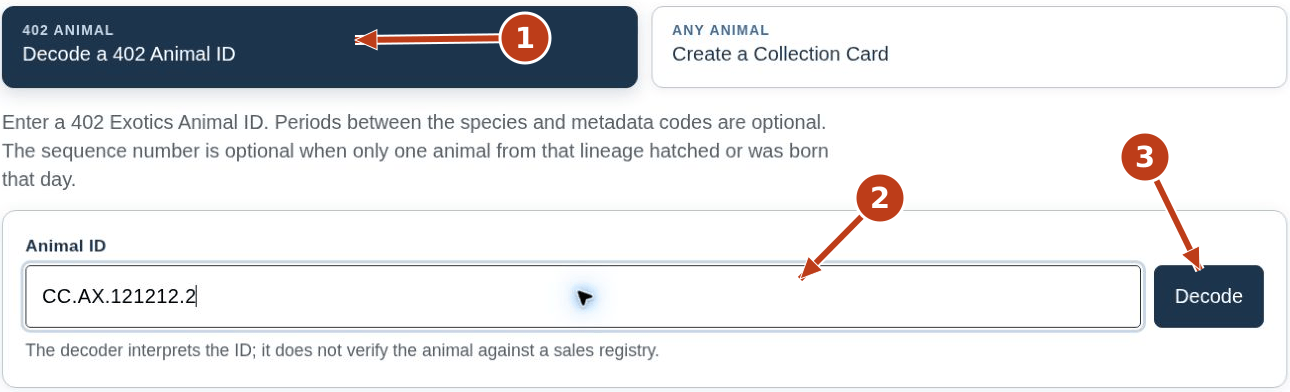
1. Select 402 animal. Use the tab labeled “Decode a 402 Animal ID.”
2. Enter the ID. Type or paste it into “Animal ID.” Both CC.AX.121212.2 and CCAX121212.2 work for this example; lowercase letters also work.
3. Select Decode. Read the result below the entry field. Scroll down if it is outside your screen.
Periods between the species and metadata codes are optional. Keep the final sequence number when the label includes one. If a code fails, compare it with the label before changing anything.
Numbered arrows in this guide match the nearby instructions. Screenshots show the desktop layout; on a smaller screen, scroll through the same controls.
Read the results and recorded ancestry
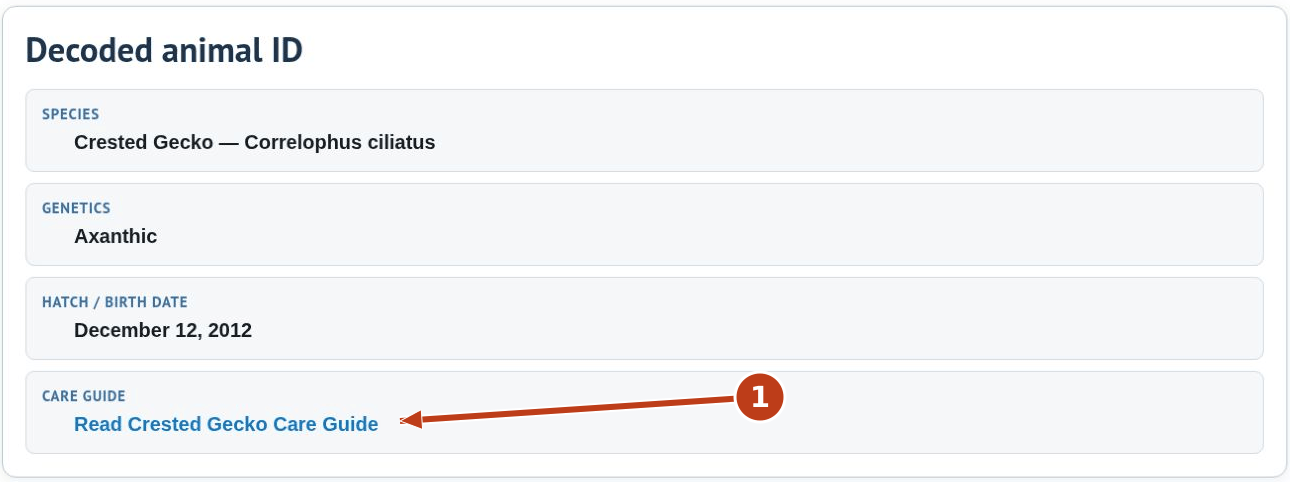
1. Open the care guide. The example decodes as Crested Gecko, Axanthic, with a hatch date of December 12, 2012. Select the care-guide link to read the species guide.
The decoder interprets the entered code. It does not independently verify genetics, authenticity, ownership, or a sale.

2. Set Ancestor generations. When a matching breeding-group record is available, use this selector to change how many generations are shown. Unknown ancestors remain unknown.
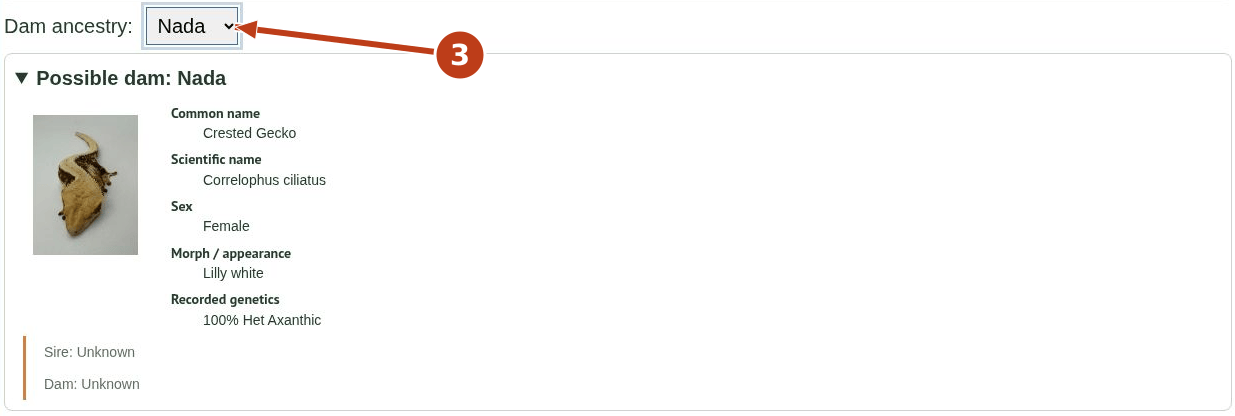
3. Choose a dam branch when offered. The “Dam ancestry” selector changes the branch displayed. A “Possible dam” label does not confirm the individual animal’s mother. Read the group and parent labels, and contact us if you need clarification.
Use the mini decoder in a care guide
The compact decoder lets you read an ID without leaving the care guide. It also provides a direct route to the cards and pedigree in the full tool.
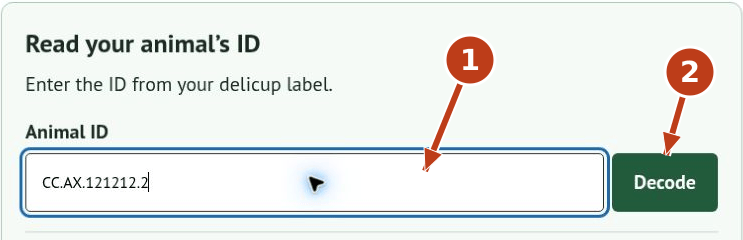
1. Enter the label ID. Find “Read your animal’s ID” and enter the complete code.
2. Select Decode. Review the species, hatch or birth date, age calculated from the coded date, and any additional decoded information.
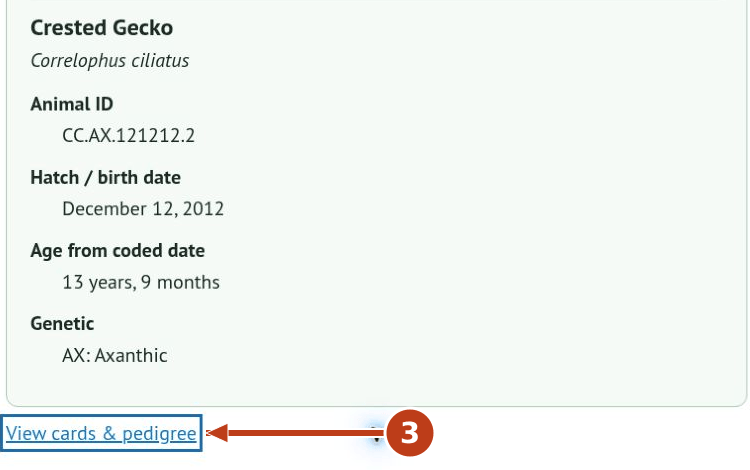
3. Select View cards & pedigree. This link sits below the mini decoder’s result. After a successful decode, it carries the entered ID into the full tool.
The example’s displayed age changes with time. Keep the original ID with your own records so you can return to the information or include it when you contact us.
Print a card for a decoded animal
After decoding a 402 Exotics ID, scroll to “Printable Animal ID Card.” The decoded information is already included in the preview.
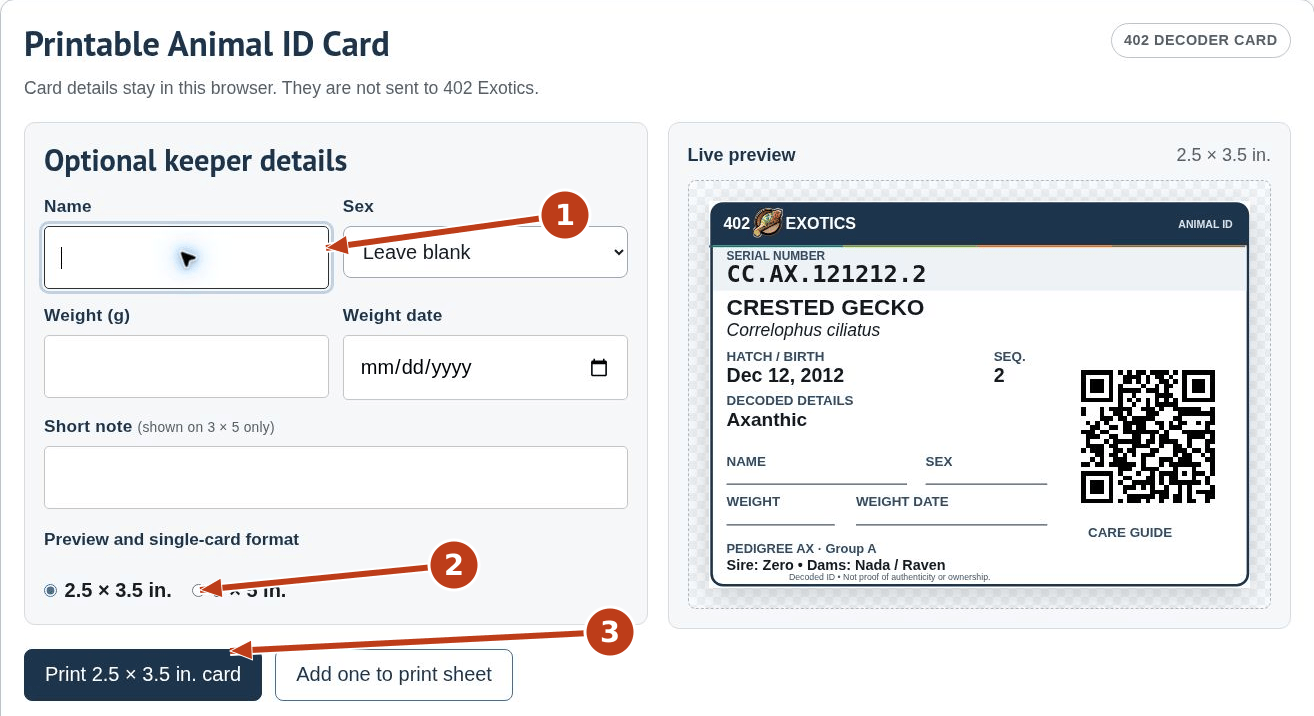
1. Add optional keeper details. Enter a name, sex, weight in grams, and weight date as needed. The short-note field appears on the 3 × 5 card only.
2. Choose the single-card size. Select 2.5 × 3.5 inches or 3 × 5 inches. Review the live preview for missing, incorrect, or crowded text.
3. Print one card or start a sheet. The dark print button prints the selected single-card format. “Add one to print sheet” adds a copy to the queue. See “Print several cards together” later in this guide for the sheet controls.
Use US Letter paper with Actual size or 100% scaling. Do not select “Fit to page.” Check one printed card’s size and scan its QR code before printing a batch.
Card details stay in the browser and are not sent to us. Keep a separate copy of your animal records.
Create a keeper card for any animal
Use Keeper Collection Cards for animals from any source. A 402 Exotics ID is not required. The information comes from your entries and is not verified by 402 Exotics.

1. Select Any animal. Choose “Create a Collection Card.” Leave “Handwritten blank template” unchecked to fill the card online.
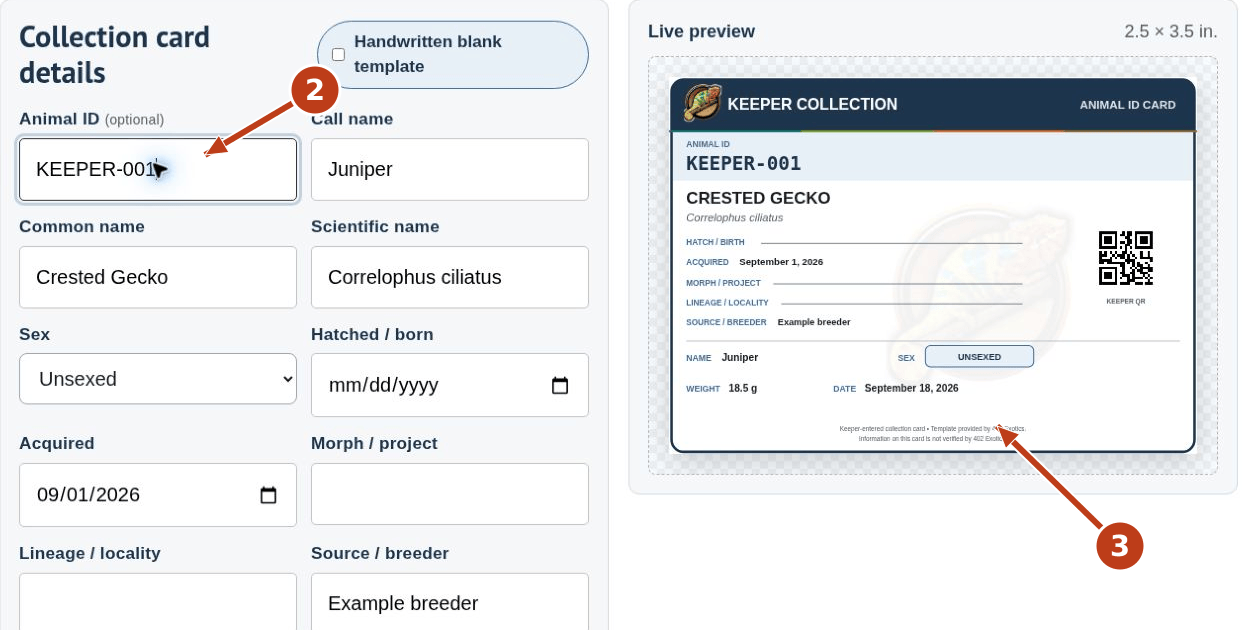
2. Enter the animal’s details. An ID is optional; use your own ID or enclosure number if useful. Add a call name, common and scientific names, and sex. Leave unknown information blank rather than guessing.
3. Check the live preview. Our fictional example uses KEEPER-001, Juniper, Crested Gecko, and Unsexed. It also shows an acquisition date, source, weight, and weight date. No hatch date is entered because it is unknown in this example.
Continue down the form for “Morph / project,” “Lineage / locality,” “Source / breeder,” weight in grams, and weight date. Keep “Hatched / born” separate from “Acquired.” Notes appear on the 3 × 5 card only.
Add a QR code or make handwritten blanks
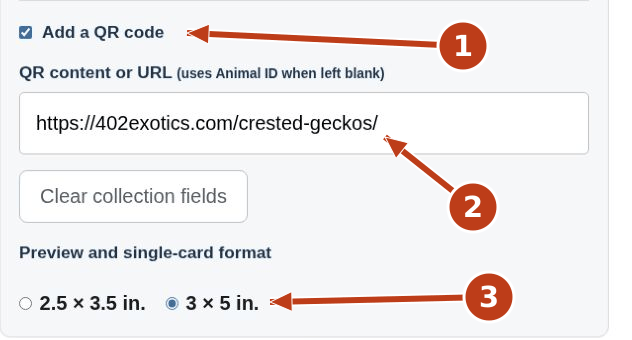
1. Enable Add a QR code if wanted. Leave it unchecked for a card without a QR code.
2. Choose what it contains. Enter a URL or text in “QR content or URL.” If this field is blank, the tool uses the Animal ID. Our example links to the crested gecko care guide. Check the destination and test a printed code.
3. Choose the card size. Select the single-card format and review the preview. Use 3 × 5 inches when you want the Notes field on the card.
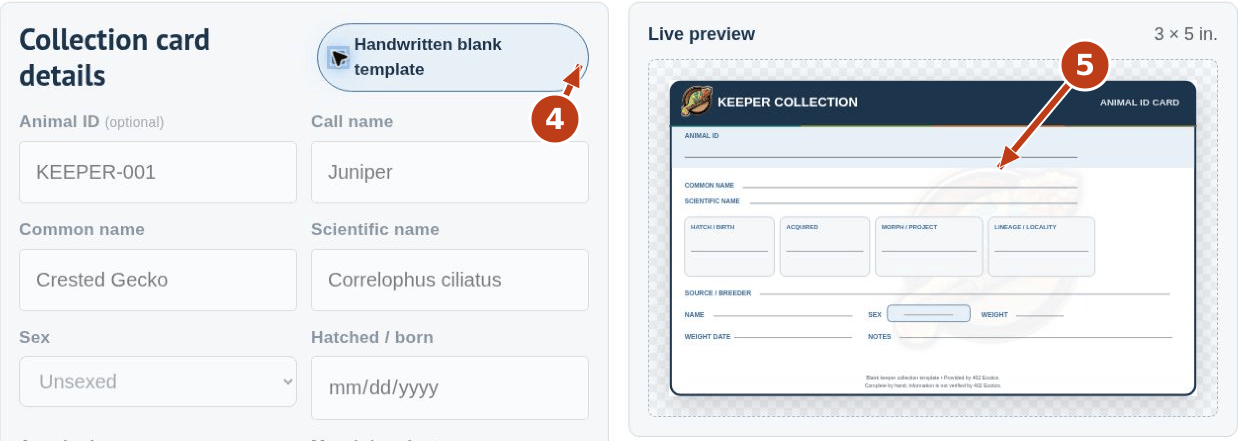
4. For empty cards, enable Handwritten blank template. The entry fields become disabled and the preview switches to blank lines for writing by hand. Existing text may remain visible in the disabled fields; inspect the preview to see what will print.
5. Check the blank preview. Choose a size, then print one blank card or add blanks to the print-sheet queue. Turn the checkbox off to return to a card filled online.
Print several cards together
The Letter-sheet queue can hold decoded 402 cards, keeper cards, and handwritten blanks. Prepare each card and review its preview before adding it.
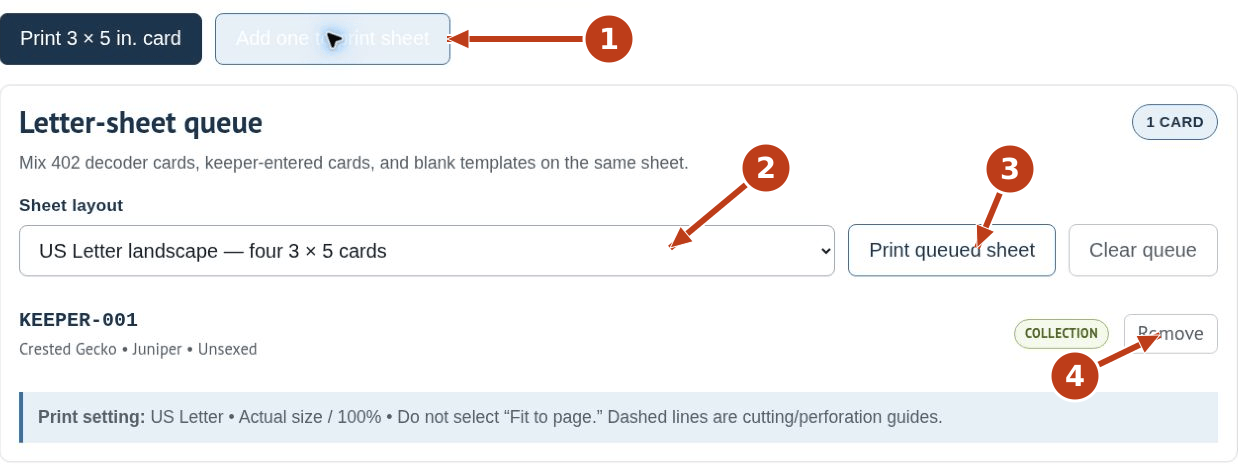
1. Select Add one to print sheet. A card appears in the queue. Prepare the next animal’s card and add it the same way. For a second copy, add the card again. Check the queue to avoid unintended duplicates.
2. Choose Sheet layout. This is separate from “Preview and single-card format.” Select US Letter for eight 2.5 × 3.5 cards, or US Letter landscape for four 3 × 5 cards. Our screenshot shows one keeper card queued with the larger sheet layout selected.
3. Select Print queued sheet. Use US Letter paper, the orientation matching the layout, and Actual size or 100% scaling in the print dialog. Do not use “Fit to page.” The dashed lines are cutting or perforation guides.
4. Correct the queue if needed. Use “Remove” beside an unwanted card. If a queued card needs different information, remove it, correct the form, and add it again. “Clear queue” removes the queued cards.
“Clear collection fields” resets the keeper-card entry form. It is a different control from “Clear queue.” Use the appropriate button and check the preview or queue afterward.
Print one sheet first. Check the text, physical card size, and QR readability before printing more. Browser and printer dialogs vary, so their appearance may differ from this guide.
Get help when an ID does not decode
Compare the entry with the original label. Look for missing characters, O versus 0, and extra text copied with the ID. Correct the entry and select Decode again. If it still fails, use the reporting form shown below.
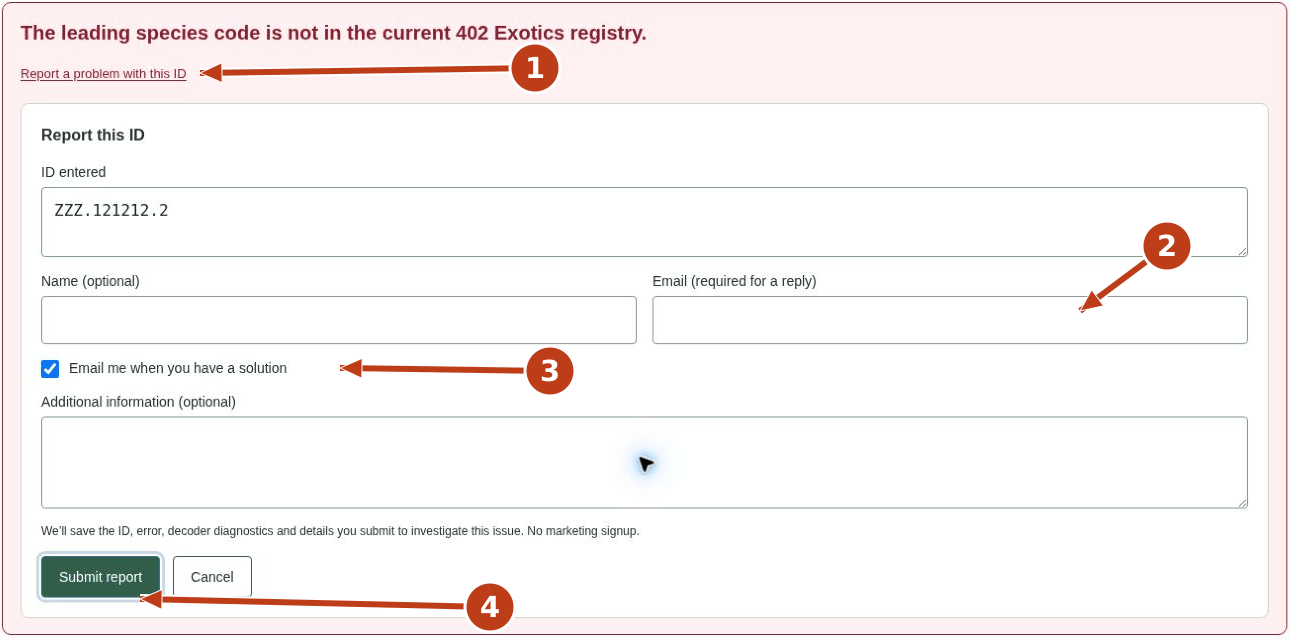
1. Select Report a problem with this ID. The form preserves the ID exactly as entered. The screenshot deliberately uses an unrecognized species code to demonstrate an error.
2. Enter an email for a reply. Your name is optional. Use an address where we can reach you.
3. Keep the reply option checked if wanted. “Email me when you have a solution” requests a follow-up. Add useful details in “Additional information,” such as what you expected or which characters are hard to read.
4. Select Submit report. The report saves the ID, error, diagnostic information, and the details you provide for investigation. It does not subscribe you to marketing.
If the ID decodes but the information seems wrong, use the Contact Hub and include the complete ID and the mismatch. If the original label is missing, contact us rather than inventing a replacement ID.