
Our Community directory helps people find businesses and organizations supporting responsible reptile keeping. Use this guide to browse, apply, and keep your listing useful. No listing account is needed. Applications and changes are reviewed before publication.
The numbers on each screenshot match the steps below it. Tap or click a screenshot to enlarge it. On a phone, the same controls may stack vertically.
In this guide
Browse or apply · Public listing · Location, links and logo · Private review · Submit · Use and update your listing
Browse the directory or start an application
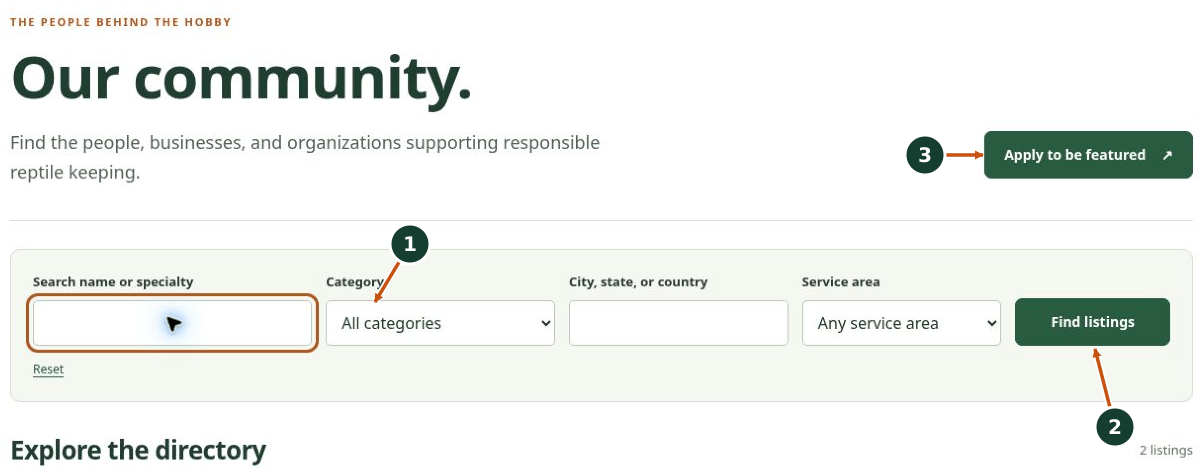
1. Search by name or specialty. Narrow the results with Category, City/state/country, and Service area. Location describes where an organization is based; service area describes how broadly it operates.
2. Choose Find listings. Use Reset to clear the filters. Check whether your organization already has a listing before applying; use its update link instead of creating a duplicate.
3. Select Apply to be featured. Prepare your public description, links, coverage, optional logo, and supporting information. Only someone authorized to represent the organization should submit.
Create a clear public introduction
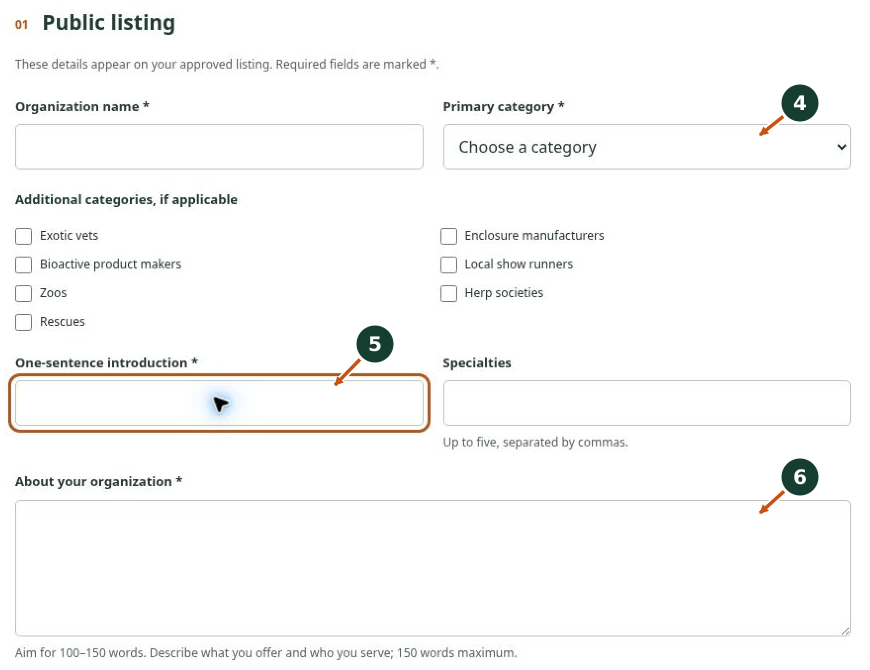
4. Enter Organization name and choose the best Primary category. Select additional categories only when they accurately describe your work. Application choices can differ from the directory filters; do not choose an unrelated category simply to get through the form.
5. Write a specific One-sentence introduction: what you offer and whom you serve. Add up to five Specialties, separated by commas. Use recognizable terms rather than repeated keywords or unsupported superlatives.
6. Write About your organization in about 100–150 words, with 150 words maximum. Explain your work, audience, experience or approach, and the next step for visitors.
A useful structure: “We provide [products or services] for [audience]. Our focus is [specialty]. We serve [area]. Visit our website to [book, browse, or contact us].” Replace the brackets with accurate information about your organization.
Set your coverage, links, and logo
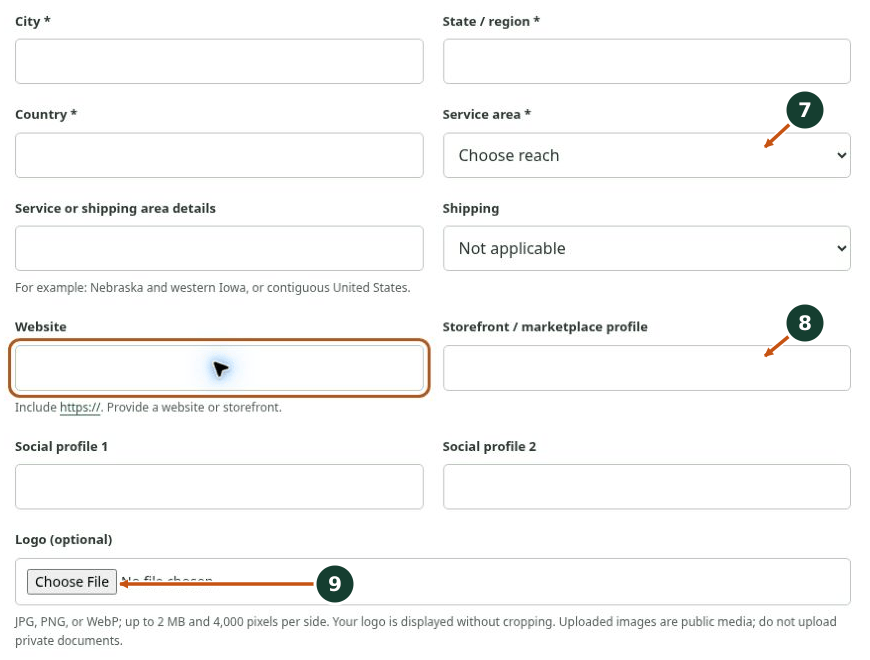
7. Enter City, State / region, and Country. Choose your Service area, explain coverage or limitations in Service or shipping area details, and select the appropriate Shipping option.
8. Provide a Website or Storefront / marketplace profile using complete links, including https://. Add up to two social profiles if useful. Check that each link works and gives visitors a clear way to contact you.
9. Optionally upload your Logo: JPG, PNG, or WebP; up to 2 MB and 4,000 pixels per side. Use authorized, legible artwork. Logos display without cropping. Uploaded images are public media—do not upload private documents.
Provide information for our review

10. Under Private review information, enter Your name, Contact email, and Your role / relationship. These fields are visible only to site administrators.
11. Answer Category information / requested changes. Read the category-specific guidance after selecting your primary category. Explain actual practices and experience, not just promotional claims.
Review and submit your application
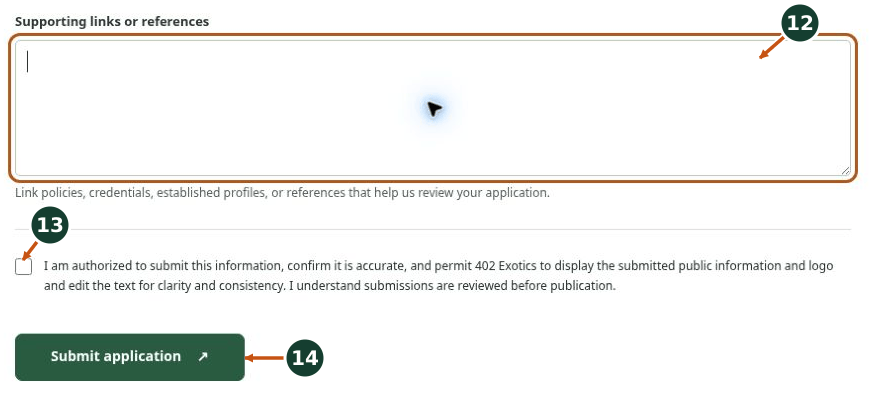
12. Add Supporting links or references such as relevant policies, credentials, established profiles, or references that help us review your application.
13. Recheck your public wording, links, coverage, and contact email. Read the permission statement. Check it only if you are authorized, the information is accurate, and you agree to the stated display and editing permissions.
14. Choose Submit application and wait for the form’s result. Correct any displayed errors. Receipt is not approval or publication; applications can be declined.
A directory listing is not a certification. The “Personally recommended by 402 Exotics” badge is a separate endorsement we choose to give based on direct experience. It is not automatically awarded when an application is approved.
Make the most of your listing—and keep it current
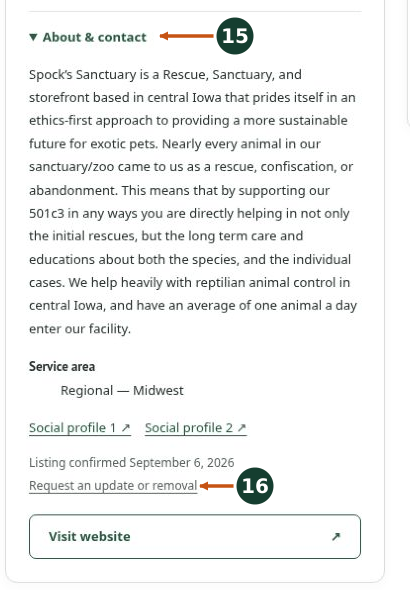
15. Open About & contact on your published listing. Check your description, service area, links, and confirmation date. Keep your linked website useful and respond through contact methods you actually monitor. Share the Community page and your organization’s name with people who could benefit; do not imply certification or an endorsement you have not received.
16. When details change, choose Request an update or removal on your own listing. Use this instead of submitting a duplicate application.
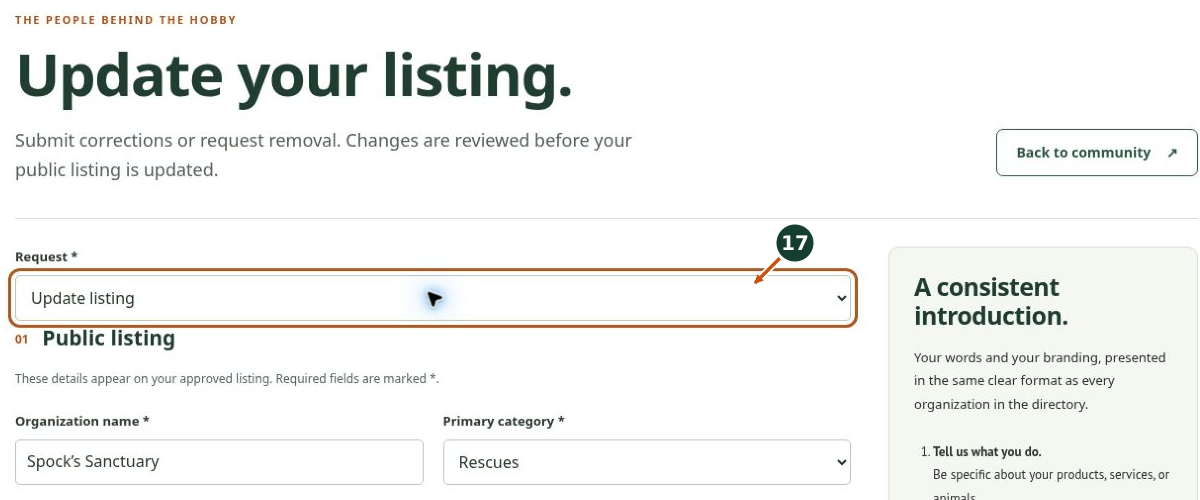
17. Choose Update listing or Remove listing in Request. For an update, correct the relevant public details and replace the logo only if needed. Explain the requested change or removal and your authority in the private review section. Check your contact email, review the permission statement, and select Submit request. Changes require approval and do not appear immediately.
The screenshots use an existing public listing to show the controls. No application, update, or removal was submitted.
Need help or a category is unavailable? Use our Contact Hub. If a submission result is unclear, keep a copy of your text and contact us rather than submitting repeated requests.